Why Your DTF/DTG Business Needs
To Get A RIP

Listen to this article on the PRESS Play With Fiona And Ray Podcast, available on Spotify, Amazon Music, and YouTube:

What is a RIP?
At its most basic, Raster Image Processor (RIP) software helps translate digital image files into a format your output device can understand. It plays a vital role in digital printing, helping to determine the color, pattern, and resolution of the final printed product. RIP software comes with some DTF and DTG printers or is purchased separately. A good RIP will significantly enhance color accuracy, workflow automation, and print quality.
When you install a RIP software package, it comes with pre-configured settings that align with the capabilities of your printer and are optimized for general printing. This provides a baseline for printing that balances factors such as color accuracy, quality, speed, and ink usage.
Since all DTF and DTG printers require RIP software, just using the default configuration keeps your business on par with the competition. Understanding the power of your RIP and leveraging its features will help you stand out.
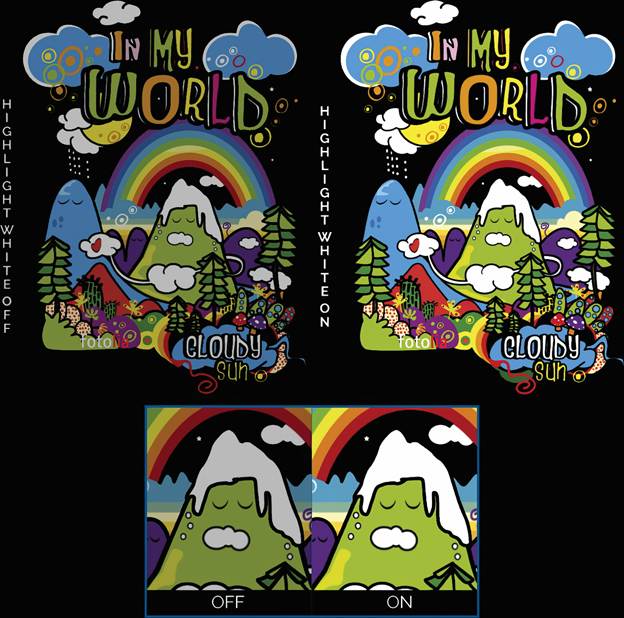
Boost the White Ink Layer
One of the most immediate ways a RIP can improve your production is color accuracy. Achieving vibrant color on colored garments such as black fabrics using DTG and DTF starts with white ink to create an underbase for the design ensuring that graphics come through.
Most RIPs provide some control over the white ink layer separate from other ink layers. This allows you to control “white” areas and the entire under base as a separate setting. Varying the white underbase will enable you to use less white ink under black ink and reduce the possibility of flooding. This also helps produce a better hand feel for graphics on darker garments.
Some RIPs now offer features allowing users to boost whites by setting different highlight and underbase ink volumes in a single Direct to Film head pass. Your RIP may also allow you to automate the highlight white feature. The RIP will automatically look at the file to be printed, and when using white, it will simply apply extra amounts in the white areas of the design.
Enhance Color with Print Modes
When it comes to enhancing color, start with basic changes by editing the images themselves in your preferred image editor. For example, Windows’ default image viewer has an option to increase the brightness and contrast in graphics. Doing so can create a more “vibrant” image. A high-quality file from a professional designer may not need as much adjustment as a file submitted from a customer’s cell phone.
By adjusting or creating new color profiles in your RIP, you can ensure that your “brand red” will match across different output devices, inks, and substrates. Paired with the perfect test print, you can then use a spectrophotometer to relay that color information back to your RIP, acting as a confirmation that the color you see in your RIP is the color your device will print. Of course, a “perfect test print” could be a flower, a drawing, or anything you can capture with a color reading device. Pairing your RIPs colors to what your machine will print is referred to as a rendering intent.
Here are some quick tips to enhance your color output:
- Use the highest resolution “picture perfect” file by making any graphic design changes.
- Add a “highlight white” layer or print your white underbase layer twice for DTG.
- Use what your RIP may refer to as an “absolute” rendering intent when printing.
- Leverage the color boost wizard (available in advanced RIPs) to automatically boost colors without oversaturation.
- Check for “Ink saving” features to eliminate too much ink, which can create color inaccuracies.

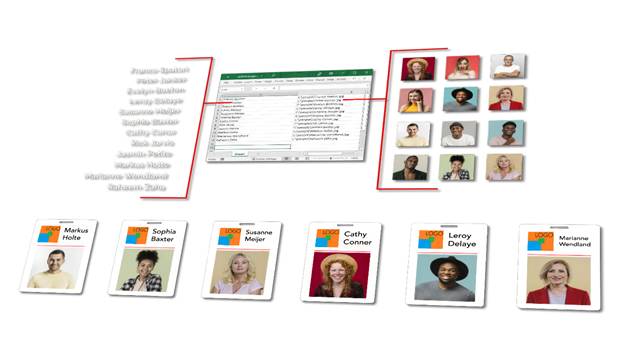
Automate Job Preparation
Software RIPs can help streamline tasks like file preparation, color correction, and job queuing. Many color features already discussed only require basic setup or parameters. More importantly, your RIP can help automate these tasks. This allows a production environment to avoid costly misprints, freeing up time for more production.
Workflow automation also extends beyond basic print tasks. Some advanced RIP solutions work seamlessly with prepress and postpress components, creating an ecosystem that optimizes the entire production chain. For example, a full-featured RIP will automatically:
- Change the size, shape, and layout of images imported in bulk.
- Change areas of a design that include text to sequential numbers (e.g., serialized badges).
- Assign images to different areas of a design (e.g.: an entire folder could become ID badges).
- Send files to a specific print queue with custom settings.
- Generate cut lines around images (e.g.: creating stickers).
- Set up a custom action to apply to a file when importing it to your RIP.
The more feature-rich your RIP is, the more automation tools you’ll be able to enjoy.
Expand Your Production
There are many features within a RIP that without much setup will have an immediate impact on your bottom line. In DTG examples, only two settings were changed – a highlight white layer, and a different rendering intent was used to boost color vibrancy. These two settings took less than 5 minutes to adjust and can quickly set you apart from the competition.
With modern RIP software, DTG and DTF printing, we’ve come full circle. Now, you can create and customize your designs and decide exactly where the design will go on your shirt. You can scale up this process, make the results more vibrant and longer lasting, improve quality, and save costs. All thanks to the software RIP.